In this guide, we’ll show you how to create a service blueprint step by step. Whether improving support, onboarding, or checkout, a blueprint helps you see the full picture—including behind-the-scenes processes. If you’re new to service blueprints, check out our what is a service blueprint guide first.
How to Make a Service Blueprint (Step-by-Step Guide)
Step 1. Preparation before you start
Before you jump into creating a service blueprint, it helps to get a few things in place.
- Set a clear goal: Know what you want to achieve, whether it’s fixing a problem, improving experience, or understanding processes.
- Pick the service or process to map: Choose one specific service or part of the customer journey to focus on. It’s best to start small—like onboarding, a return process, or a support request—so things don’t get too overwhelming.
- Bring the right people together: Get a mix of team members involved—from customer support to operations, design, and tech for a complete view.
- Gather what you need: Collect any helpful information—customer feedback, journey maps, internal process docs, or team insights. The more context you have, the more accurate your blueprint will be.
Step 2. Choose a service scenario or user journey
Now that you know what you’re working toward, it’s time to pick the part of the service you want to map.
Start by choosing one clear scenario—something like a customer signing up for your product, placing an order, or reaching out for support. Think of it as a single slice of the overall experience.
Tip: Start small. Trying to map everything at once can get messy fast. It’s easier (and more effective) to focus on one part of the journey and get it right. You can always build more blueprints later as needed. By narrowing your scope, you’ll be able to dig deeper and catch the details that matter most.
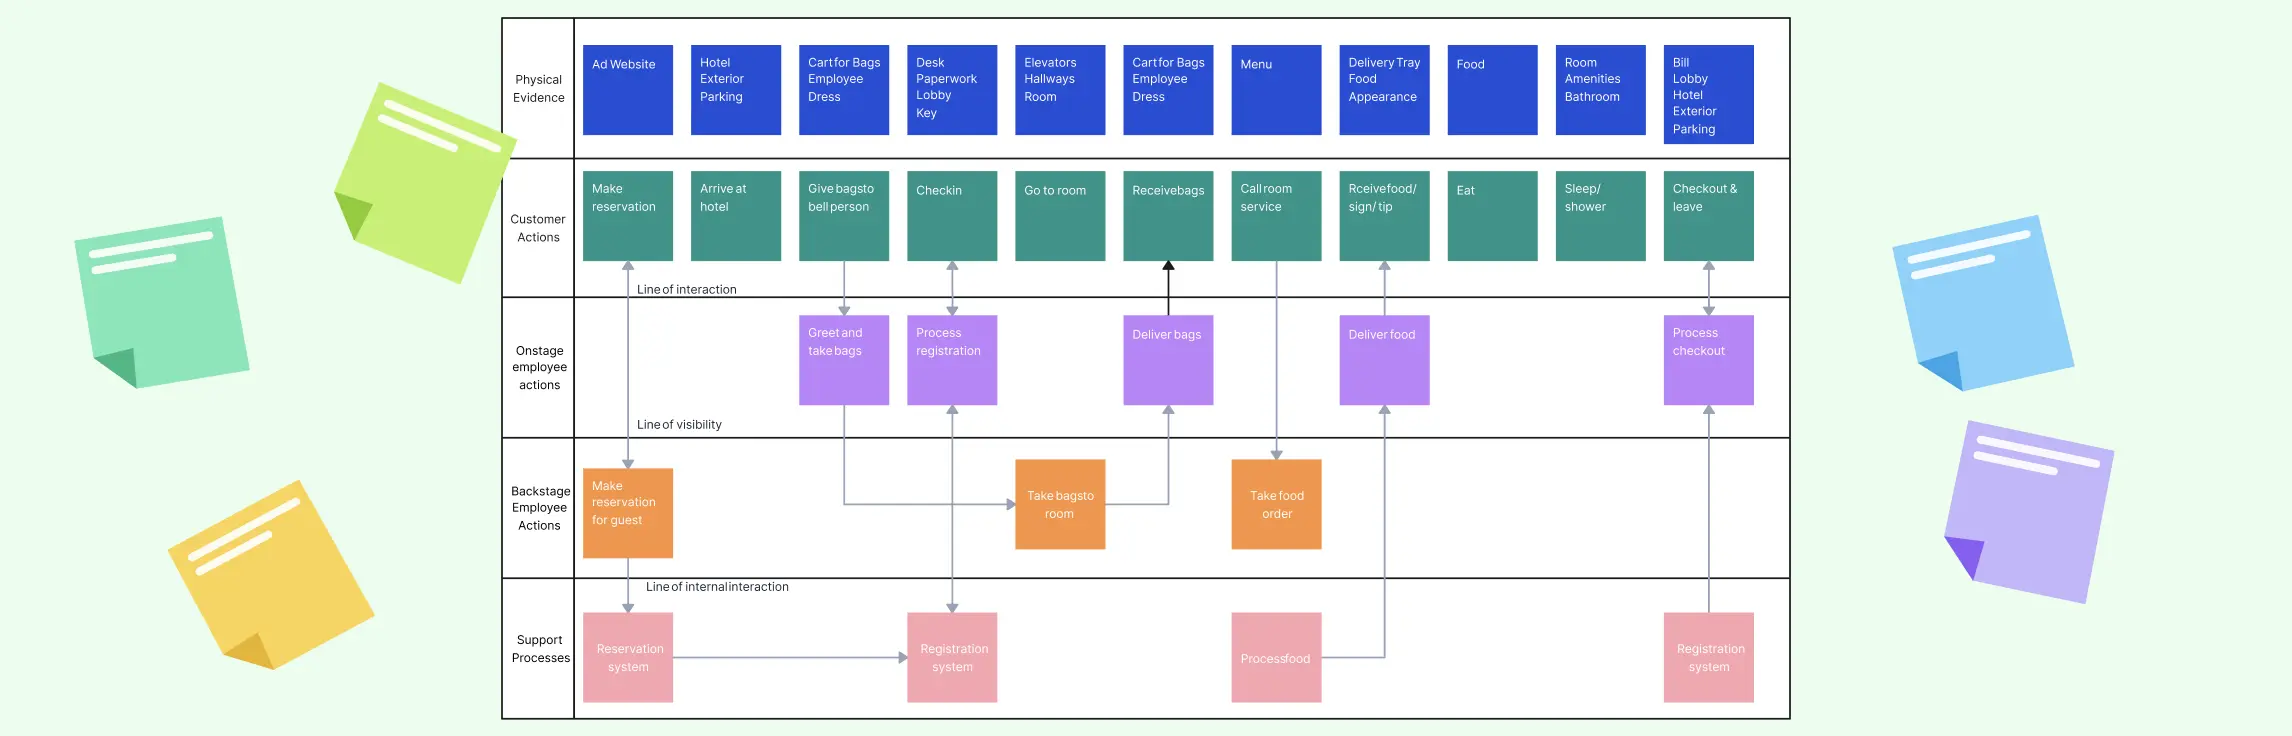
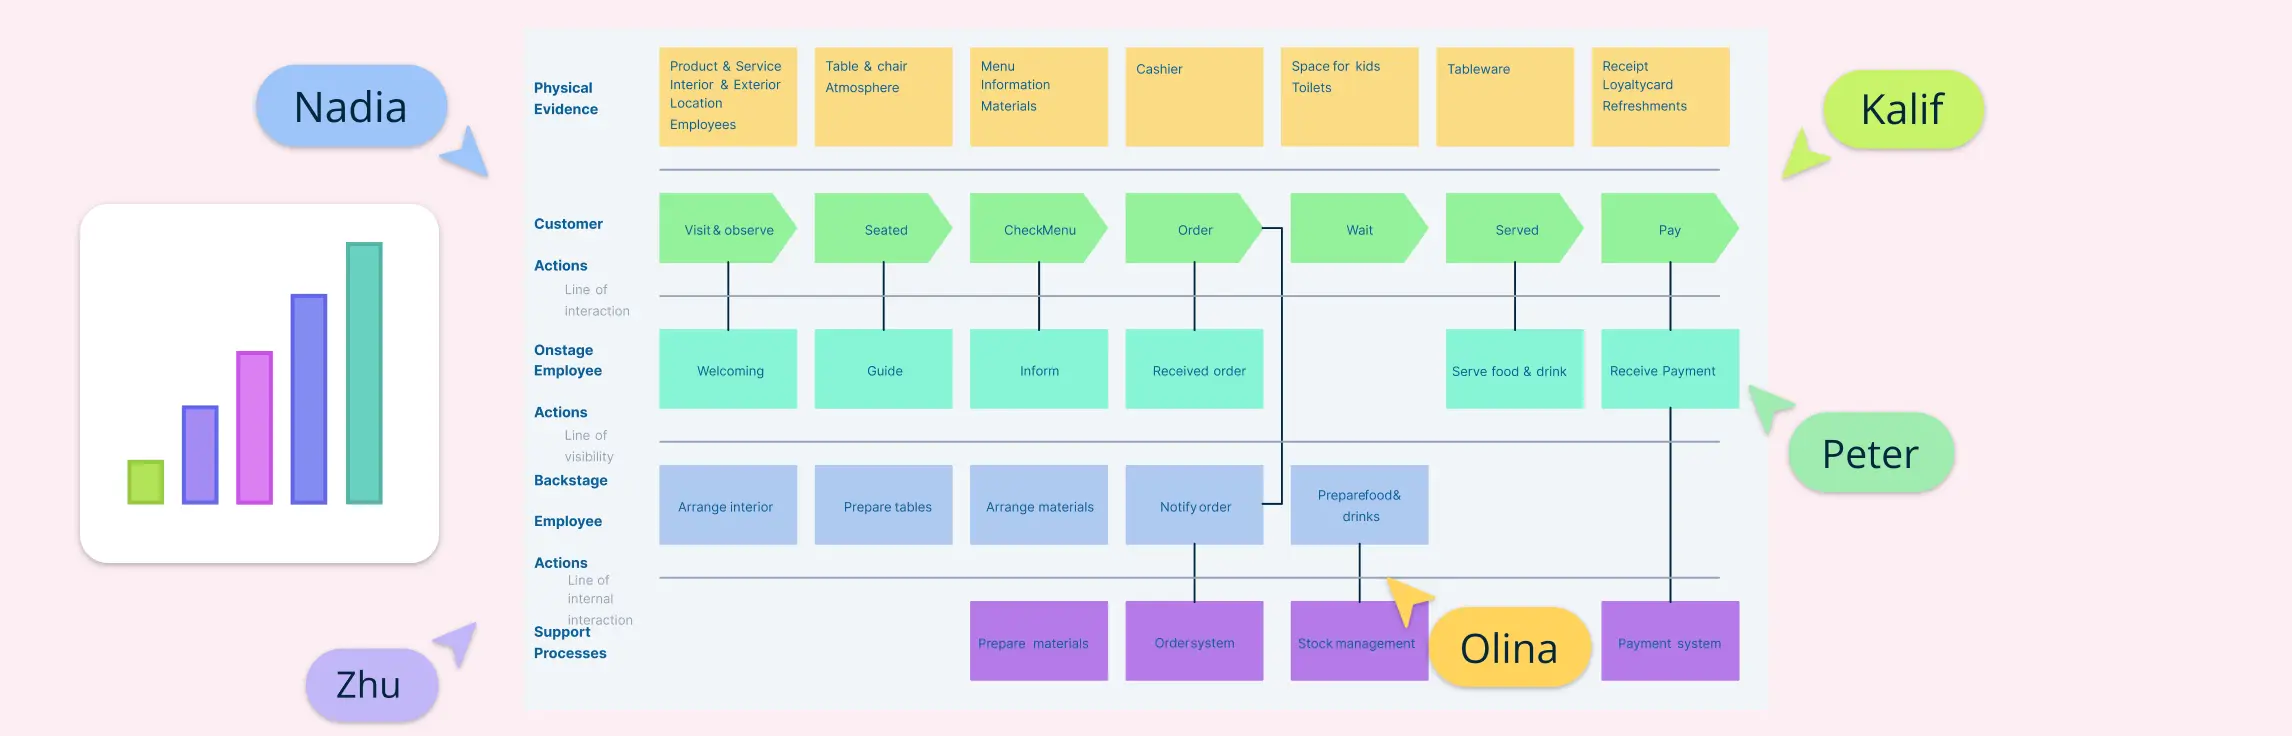
Step 3: Define customer actions
Start by laying out every step the customer takes while interacting with your service—from their point of view.
What do they do first? What happens next? Are they filling out a form, calling support, clicking a button, waiting for a confirmation email? List out each action in the order it happens.
Think like the customer
This part is all about walking in their shoes. Try to see the journey through their eyes, not from an internal or technical perspective. What are they trying to accomplish at each step? What might be confusing or frustrating?
Understanding these actions clearly helps you build a blueprint that truly reflects the customer experience—not just the company’s version of it.
Step 4. Map frontstage interactions
Once you’ve mapped out what the customer does, it’s time to look at what they see on your side—these are the frontstage interactions.
These include anything the customer directly interacts with, like your website, mobile app, or a conversation with a support agent. Each of these is a touchpoint—a moment where the customer comes in contact with your service.
Show what the customer sees
Ask yourself: At each step in their journey, who or what is the customer interacting with?
It could be:
- Clicking a button on your app
- Talking to a live chat agent
- Getting an automated email
- Visiting a physical store
These frontstage actions are key moments that shape the customer experience. Mapping them out helps you see where things are working—and where they might need fixing.
Step 5. Identify backstage interactions
Not everything that supports a customer experience happens in plain sight. Backstage interactions are all the things your team does behind the scenes that the customer doesn’t see—but they still play a big role in how the service feels.
This could include:
- A support agent checking internal notes before replying
- An automated system processing a payment
- A warehouse team packing an order
- An internal tool triggering a confirmation email
Mapping out these hidden actions helps you understand how your internal processes connect to what the customer sees—and where things might be falling short.
Step 6. Add support processes
Behind every smooth customer experience, there’s a whole network of teams and tools working together in the background. These are your support processes—the systems, departments, and third-party services that keep everything running.
This might include:
- IT teams managing your website and internal systems
- HR handling staffing for frontline roles
- Finance teams processing refunds
- External tools like CRMs, helpdesk software, or delivery services
Show the full picture
Even though these processes aren’t directly tied to a single customer step, they help make the service possible. Adding them to your blueprint gives you a more complete view of what’s really happening across your organization.
It also helps spot where support systems might be causing delays, miscommunications, or breakdowns that affect the customer experience.
Step 7. Define lines of interaction
Now that you’ve mapped out what happens at each layer of the service, it’s time to connect them using lines that show how everything fits together. These lines help organize your blueprint clearly, making it easier to spot handoffs, breakdowns, and gaps in communication between layers. They also help different teams understand where their work fits into the bigger picture.
There are typically three key lines used in a service blueprint:
Line of interaction: This separates the customer from the front stage. It shows where the customer directly interacts with your service—through a website, app, staff member, etc.
Line of visibility: This separates what the customer can see (frontstage) from what happens behind the scenes (backstage). Everything above this line is visible to the customer, while everything below is hidden.
Line of internal action: This separates the backstage from the support processes. It helps you see what’s handled by internal teams or third-party systems that don’t interact directly with customers but still impact the service.
Step 8. Include time, emotions, and metrics (optional but valuable)
Once you’ve mapped out the structure of your service, you can go a step further by layering in some extra details that add real depth to your blueprint.
Add time: How long does each step take? Are there any points where customers wait too long? Adding time helps you spot delays and opportunities to speed things up.
Track emotions: Try mapping how the customer feels at each step. Are they confused, frustrated, satisfied, or delighted? This helps you understand emotional highs and lows—and where you might need to improve the experience.
Include metrics or pain points: Where are things breaking down? What parts get the most complaints or drop-offs? Add performance data like: number of support tickets, conversion rates, and common errors.
Step 9. Review and validate
Once your blueprint is drafted, don’t keep it to yourself. Bring in team members from different departments to review it together. Their feedback helps catch mistakes, fill in missing details, and make sure the map reflects reality.
Walk through real-life scenarios with the team to see if the blueprint covers everything. Look out for:
- Steps that repeat unnecessarily
- Gaps where nothing happens
- Bottlenecks causing delays or frustration
Step 10. Digitize, share, and update
After you’ve reviewed and finalized your blueprint, it’s time to bring it to life as a living, digital document.
Using Creately makes this process simple and effective. Creately offers an easy-to-use online platform where you can create clean, professional service blueprints without needing design skills.
- Drag-and-drop interface lets you quickly build and customize your blueprint with shapes, lines, and layers.
- Collaboration tools allow your whole team to view, comment, and edit in real-time—keeping everyone on the same page.
- Version control means you can track changes and revert to earlier versions if needed.
- Creately AI helps speed up your work by generating blueprint elements or suggesting improvements based on your input—perfect for brainstorming or refining your design faster.
- AI-powered service blueprint template gives you a ready-made starting point tailored to common service scenarios. Just customize and expand to fit your unique process.
Once digitized, store your blueprint in a shared space so everyone can access it whenever they need. And remember, a service blueprint isn’t a one-time project—it needs regular updates as your service evolves, so set a routine to revisit and refresh it often.
Get started right away with these service blueprint examples
Hotel Service Blueprint Example


Hospital Service Blueprint Example

Blank Service Blueprint Example

Movie Theater Service Blueprint Example

Finance Industy Service Blueprint Example

Best Practices for Creating Service Blueprints
- Start with a goal: Know exactly what you’re trying to solve or understand—don’t map just for the sake of it.
- Define the scope: Focus on a specific process or customer journey. Don’t try to map everything at once.
- Map the customer journey first: Begin with what the customer does and experiences, then layer in internal steps.
- Use clear swimlanes: Separate customer actions, frontstage staff, backstage roles, and support systems for easy readability.
- Involve cross-functional teams: Get input from different departments to capture the full picture.
- Keep it visual, not cluttered: Use simple shapes, clean labels, and only include what’s relevant.
- Add supporting details: Include evidence like emails, receipts, or system triggers to ground each step.
Resources
Abugeddida, R.A. and Donnellan, P. (2021). Service Blueprint Technique for Designing and Improving Service: A Literature Review. [online] ResearchGate. doi:https://doi.org/10.13140/RG.2.2.16423.88482.
Shahin, A. (2010). Service Blueprinting: An Effective Approach for Targeting Critical Service Processes – With a Case Study in a Four-Star International Hotel. Journal of Management Research, 2(2). doi:https://doi.org/10.5296/jmr.v2i2.352.
FAQs About Service Blueprinting
How long does it take to create a service blueprint?
Who should be involved in creating a blueprint?
Can I use service blueprints for internal processes?
What’s the difference between a blueprint and a journey map?
What are the common mistakes to avoid when creating a service blueprint?